Monday, May 1, 2017

Simple JavaScript Application with MEAN


In this tutorial we will allow users to enter a first name and a last name that will save to the MongoDB database.

I have used JetBrains WebStorm IDE for this tutorial.

Create a project in Webstorm to get started.
.
First step is to create a file that will contain the code for our Node.js server. So create a file and call it as app.js  and include the below code.


In order for express , body-parser and mongoose to work you should install them to the package,json file as dependencies.

First, go to the directory of the project and run these commands in the command prompt.

1. npm init  - The command prompt will ask you some questions and it will create the package.json                           file.

2.Then run these commands.

         npm install express --save

         npm install mongoose --save

         npm install body-parser --save

After installing them you can open the package.json file and see whether those frameworks have been installed properly.

Create a html file and call it as index.html and paste the below code.

<!DOCTYPE html>
<html>
  <head>
    <title>Intro to Node and MongoDB</title>
  </head>

  <body>
   
    <form method="post" action="/addname">
      <label>Enter Your Name</label><br>
      <input type="text" name="firstName" placeholder="Enter first               name..." required>
      <input type="text" name="lastName" placeholder="Enter last name..."       required>
      <input type="submit" value="Add Name">
    </form>
  </body>
</html>


After doing so save the code and go to the project directory open the command prompt and run node app.js to start our server.

Make sure your mongod is running. 

Open up a browser and navigate to the url

http://localhost:3000

Enter your first name and last name in the input fields and then click the “Add Name” button. You should get back text that says the name has been saved to the database.


Monday, March 13, 2017

How I built a simple calculator using AngularJS in less than 15mins

Hi there! Yeah you read that right!
I'm starting to love AngularJS framework. I should have used this framework for my previous academic projects since this feature called data binding eliminates much of the code.

Before we start there are three components of AngularJS that you should know to understand how this simple calculator works. 😏 
  1. ng-app - This directive defines and links an AngularJS application to HTML.
  2. ng-model - Binds the values of AngularJS application data to HTML input controls.
  3. ng-bind - Binds the AngularJS application to HTML tags
  4. ng-controller - It defines the application controller.Controller is a JavaScript Object created by                           a standard JavaScript Constructor.

Now that we know these main components lets get started!!!

If you have read my previous articles on JavaScript then you'll see that I have separated the HTML part and JavaScript part in separate files and I did the same here.


HTML part!


As you can see this HTML code is fairly simple! The ng-app and ng-controller is declared in a single div element rather than declaring them in an extra level.

And also we have 2 input boxes and select element which has ng-model to bind the values entered into the input boxes to the AngularJS application data. 

The last part we have a function call {{ result() }} in the directive which is interesting! 

JavaScript part!


An AngularJS module (angular.module() ) defines an application and it is a container for the different parts of an application,
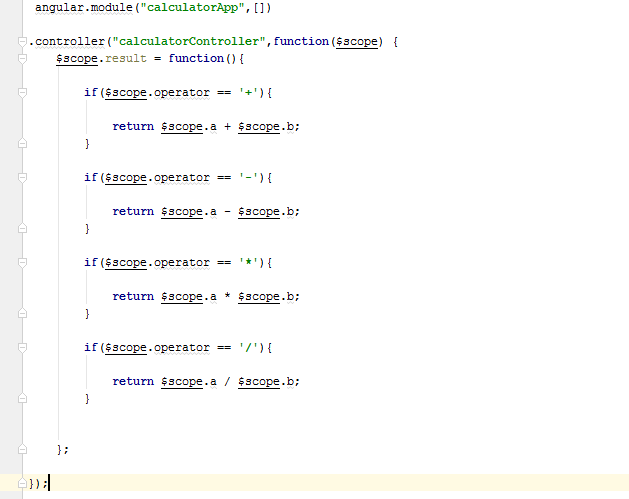
In the JavaScript part we create a angular module and controller and we declare the result as an attribute of the current scope. 
And when you make a controller in AngularJS, you pass the $scope object as an argument.

.controller( "      " , function($scope) {

 $scope.result = function() {}

}

And the last part of the JavaScript code calculating the math operations are simple which is familiar hence not worth going in detail.

Happy coding!!! ✌👍

--Ashen Jayasinghe--


Tuesday, February 21, 2017

Javascript Tutorial


First I will be explaining the answers for the questions in the 2nd lab sheet in detail and the screenshots of the working code will be shown at the end of each question.

1)

//write a function as a variable that prints "Hello World" to console and another function which //accepts that variable.


var printHello = function () {

console.log("Hello World");

}

printHello(); //calling function


// The argument passed to the second function should be executed as a function inside the body.

function getInstance (hello) {

hello();

}

//Call the second function passing the first function as the argument.

getInstance(printHello);


Okay now we are done with the first question!!! 😄😄 Moving on to the 2nd question.
   

2) 

Use curly brackets to create JSON like JavaScript object and add properties and functions to the object.


3 )

  • Declare a global variable named vehicleName in the window object
                            window.vehicleName = "Toyota";


  •   Declare a method named printVehicleName to print out the vehicle name
                                     function printvehicleName() {

                 console.log("Vehicle Name = " + this.vehicleName);
                           }                                 

  •  Declare an object named Vehicle(using object literal notation) which have a variable called vehicleName and declare a function named getVehicleName and assign it with the printVehicleName
                                       var Vehicle = {

                        vehicleName:"Nissan",
                        amount:100,
                        id:001,
                        getVehicleName:printvehicleName //.bind(window)                                    
                       };


  •  Execute the printVehicleName function and the getVehicleName functions to see the results
                                       printVehicleName();

                      Vehicle.getVehicleName();


  Correct the getVehicleName to print out the global variable vehicleName using the this keyword.

                        function printVehicleName() {

              console.log(this); // this prints the global vehicle name 'Toyota'

              console.log("Vehicle Name = " + this.vehicleName); // prints 'Nissan'
                       
                    }


4)
    Create a separate function using JavaScript closure which accepts the tax percentage and returns a function which accepts the amount and returns the amount after adding tax percentage. Try adding tax percentage to ‘this’ object and check if it works.


5)

Write a function to call GitHub API (https://api.github.com/users) and get users and return the users to the caller.

Monday, February 20, 2017

DevOps and Continuous Integration

What is DevOps ?


DevOps is a combination of software development and operations and it uses the practices and tools that enhance an organization's ability to deliver applications and services faster.

Rather than seeing these as two distinct groups who are responsible for their specific tasks but don’t really work together, the DevOps method recognizes the interdependence of the two groups. By integrating development and operation as one team or department, DevOps helps an organization deploy software more frequently, while maintaining service stability and gaining the speed necessary for more innovation.


And, in the end, everyone is able to deliver the best results and overall experience possible to the customer.


Benefits of DevOps 

  1. Speed
  2. Rapid delivery of applications. (Continuous Integration and Continuous Delivery)
  3. Reliability
  4. Scale
  5. Security

What is Continuous Integration ?


Initially developer's update their code to the code repository once a day. Without continuous integration, the odds of one developer’s changes conflicting with another developer’s changes are very high. When long periods of time go by without integration, the problems that surface can be huge and costly to track down and fix.


A developer starts by checking their code out of the depository, makes the changes needed, tests and, fi the code passes all tests, checks in the changed code and tests again to ensure that other programmers’ changes aren’t in conflict. Because everyone is starting from the freshest code available and checks their code in frequently, bugs are easier to track down and it’s easier to revert back to known good code.


Continuous integration offers these benefits:
  1. It reduces the risk of project derailment.
  2. It helps prevent integration problems cropping up at release when everyone tries to make incompatible versions work together.
  3. Developers communicate better.
  4. Changes are always made to the freshest code base rather than obsolete code.
  5. Problems and bugs are found faster because the size of the changed code is smaller. 

With continuous integration, the code that’s checked into the repository is always ready to be deployed to end users, leading to continuous deployment.

--- Ashen Jayasinghe ---

Saturday, February 18, 2017

JavaScript Classes and Prototypes

This is a tutorial on the 1st lab session of Application Frameworks conducted at SLIIT for the 3rd year 1st semester batch .
Basically in this tutorial we will learn about JavaScript functions, variables, statements etc.

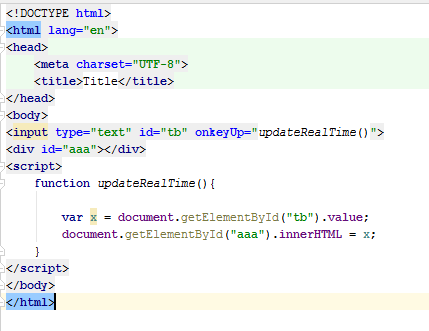
 First question is  to write a JavaScript function to update a text typed by a user in a text box to a div in real time. 


Note that i have used "onKeyUp" as a event for the textbox. The onKeyUp event executes the JavaScript function when the user releases a key on the keyboard.

Second question is to create a JavaScript class called Vehicle and Car. Car class should extend from Vehicle class. Vehicle class should have a method to set and price of the Vehicle.

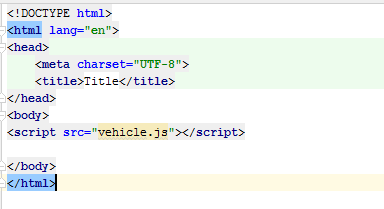
First of all I created a html file and a JavaScript file and linked the js file to the the html file as shown below.


In JavaScript we don't define methods inside the constructor function instead we add functions to the prototype chain.

function Vehicle () {
   
             this.amount = 1000;
                                  
                                 }

Vehicle.prototype.setAmount = function (amount) {
             
               this.amount = amount ; 
  
                                }

We can use the Object.create() approach to extend Car class from Vehicle Class. (Inheritance)

Car.prototype = Object.create(Vehicle.prototype);

Car.prototype.constructor = Car; //This is just to make sure that the correct constructor is being called.
Next we should create a object from Car class
var car = new Car();

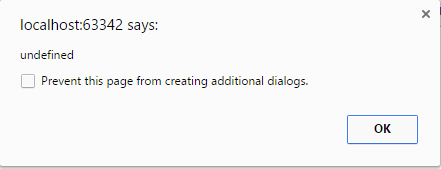
Notice that the amount is printing as undefined and when you enter OK the new set amount is displayed as 10000.


--- Ashen Jayasinghe ---

Monday, February 6, 2017

Student Management System

SLIIT 2nd year Final Project - Student Management System


For the 2nd year 2nd semester Final IT Project we developed a Management System for SLIIT Kandy Branch. This system will provide easy solutions to various major issues faced by the institution with their manual system.

As we know the success of an educational organizational highly depends on its ability to get accurate and reliable on carrying out operations of different nature and to manage these information effectively for future use. It consumes a lot of time to manually keep track of all activities, subjected to crash and is inefficient. Hence, an automated system is demanding.

The core objective this system is to come up with an up to date system which will perform the required administrative and management tasks efficiently. It will also provide an integrated system as they were handling all activities separately.

For the problem introduced by our client we decided to implement a Web based system that will deliver the tools to simplify the tasks of managing the data and extracting information effectively.


Other objectives are as follows.

  1. Keep track of Student Attendance, Financial Data, and Exam Results etc. 
  2. Manage Inventory items and reduce data duplication. 
  3. Increase security by managing different user levels 
  4. Simplify hours of complex complications such as calculating accounting data. 
  5. Generate various kind of Charts to analyze data. 
  6. System inbuilt Print, Email, Export and other special functions.


Other benefits that will be provided by the system are as follows.

  1. Efficient record management. 
  2. User friendly interfaces 
  3. Search records efficiently 
  4. Easy to use. 
  5. Concurrent use. 
Main goal of developing this system is to provide a software solution in the form of a web application to automate the manual processes done by the staff members in order to increase the convenience and efficiency.

What you did individually to the Project?


Our group had 8 members and we divided the project into 8 sections and assigned them accordingly. I did the Accounting section of the project. 

Following are the functions that I developed. 
  1. Record (Add, edit, update, delete) degree student fees, Expense Details. 
  2. User friendly Data insert and email interfaces. 
  3. Record Daily Expenses.(Automatically calculates Price, Balance due, Total, Sub Total ) 
  4. Dynamic Search options (Search Student No, Expense No) in every page. 
  5. Sending payment confirmation and payment reminder emails for each student. 
  6. Send email option to anyone. 
  7. Print data driven and live editable Receipts, Purchase Order, Invoice. 
  8. Export all tables to xls format. 
  9.  Analyze tables (Degree Student fee and Expense detail tables) from data driven Charts.


Analysing Expenses using Bar charts

.

If you were to do it again what would you have done differently?

.
I would use a framework like Codeigniter to build the web application and introduce it to the other members as well rather than coding the application manually. Using a framework would have made development easier and we would have saved a lot of time and focusing on developing more functions from the saved time.
Understanding more about my team members' strengths and weaknesses.
Should have used a code repository tool like git or GitHub.
.
Technologies used: HTML5, CSS 3, JavaScript, JQuery, MySQL, PHP, Bootstrap framework, PHPMailer, Adobe Photoshop, Adobe Dreamweaver, WAMP. 

--Ashen Jayasinghe --