Showing posts with label JavaScript. Show all posts

Monday, August 27, 2018

Implementing Cross-Site Request Forgery (CSRF) Protection

Hi there!
In this blog post, I will explain how to implement CSRF protection in web applications. But first, 

What is CSRF?

Cross-Site Request Forgery (CSRF) is an attack that forces an end user to execute unwanted actions on a web application in which they're currently authenticated. CSRF attacks specifically target state-changing requests, not theft of data, since the attacker has no way to see the response to the forged request. With a little help of social engineering (such as sending a link via email or chat), an attacker may trick the users of a web application into executing actions of the attacker's choosing. If the victim is a normal user, a successful CSRF attack can force the user to perform state changing requests like transferring funds, changing their email address, and so forth. If the victim is an administrative account, CSRF can compromise the entire web application.

How we can defend against CSRF?

There are numerous patterns to defend against CSRF. In this post, I will explain only two recommended patterns using a sample web application for each pattern implemented in JavaScript.

  • Synchronizer Token Pattern
  • Double Submit Cookies Pattern


Synchronizer Token Pattern


You can find the link to Synchronizer token pattern Web application GitHub repository here. For demonstration purposes, a user login with hard coded credentials are implemented in the web application.  The Synchronizer token pattern is explained using following criteria's.

1.  User login - I have used hard coded login credentials for simplicity.


2. Upon login, generate session identifier and set as a cookie in the browser.


The following code will generate a session identifier and set a session cookie in the browser upon login as show in the chrome developer tool screenshot.

I have used a session middleware called "express-session" and UUID library for defining session id as a best practice.


3. At the same time, generate the CSRF token and store it in the server side.


The CSRF token is stored in memory and mapped to the session identifier. I have not used a CSRF middleware like csurf for creation and validation of a token, instead I have done the csrf implementation step by step.


Note that the console log is for testing purposes.

4. Implement an endpoint that accepts HTTP POST requests and respond with the CSRF token.


The endpoint '/middleware' receives the session cookie and it is validated with the session id stored  in the server side memory store. This session validation process is handled by the session middleware 'express-session' explained in the second step.
If the session id's are matching, the csrf token is returned to the front-end.


5. Implement a webpage that has a HTML form. The method should be POST and action should be another URL ( '/login' ) in the website. When this page loads, execute an Ajax call ( onLoadPage() ) via a javascript, which invokes the endpoint ( '/middleware' ) for obtaining the CSRF token created for the session.


I have used Fetch API to invoke the endpoint '/middleware' and obtain the csrf token when the page loads.


 <htmllang="en">  
  <head>  
   <meta charset="UTF-8">  
   <meta name="viewport" content="width=device-width, initial-scale=1.0">  
   <meta http-equiv="X-UA-Compatible" content="ie=edge">  
   <script>  
    //AJAX CALL
    function onloadPage() {  
     fetch('/middleware', {  
      credentials: 'same-origin',  
      method: 'POST', // or 'PUT'  
      body: {}, // data can be `string` or {object}!  
      headers: {  
       'Content-Type': 'application/json'  
      }  
     }).then((resp) => resp.json()) // Transform the data into json  
      .then(function (data) {  
       console.log(JSON.stringify(data));  
       var form = document.getElementById("form");  
       var input = document.createElement("input");  
       input.type = "hidden";  
       input.name = "_csrf";  
       input.value = data.csrfToken;  
       form.appendChild(input);  
      })  
    }  
   </script>  
  </head>  
  <body onload="onloadPage()">  
   <div class="login">  
    <div class="login-triangle"></div>  
    <h2 class="login-header">Log in</h2>  
    <form id="form" action="/login" method="POST" class="login-container">  
     <p>  
      <input type="email" placeholder="Email" name="email" value="jayasinghe.ashen@gmail.com">  
     </p>  
     <p>  
      <input type="password" placeholder="Password" password="password" value="123456">  
     </p>  
     <p>  
      <input type="submit" value="Log in">  
     </p>  
    </form>  
   </div>  
  </body>  
  </html>  


6. Once the page is loaded, modify the HTML form’s document object model (DOM) and add a new hidden field that has the value of the received CSRF token.


 <script>  
  //AJAX CALL  
    function onloadPage() {  
     fetch('/middleware', {  
      credentials: 'same-origin',  
      method: 'POST', // or 'PUT'  
      body: {}, // data can be `string` or {object}!  
      headers: {  
       'Content-Type': 'application/json'  
      }  
     }).then((resp) => resp.json()) // Transform the data into json  
      .then(function (data) {  
       console.log(JSON.stringify(data));  
       var form = document.getElementById("form");  
       var input = document.createElement("input");  
       input.type = "hidden";  
       input.name = "_csrf";  
       input.value = data.csrfToken;  
       form.appendChild(input);  
      })  
    }  
   </script>  

Once we obtain the csrf token returned from '/middleware' endpoint, we obtain the form id and assign it to a variable called 'form' and then, create a input type element and assign it to a variable called 'input'. 
Thereafter, we set input type, name and value as hidden, '_csrf' and the csrf token value obtained from the ajax call when the page loads and then we append the updated input element as one of the child elements to the html form element.


7. Once the HTML form is submitted to the action, in the server side, extract the received CSRF token value and check if it is the correct token issued for the particular session.


In the above code, we check if the session csrf token and the csrf token passed from the hidden input field or body is the same. if it is same, then we show a success message shown in the screenshot. If it is not same, we show 'Invalid CSRF Token' error message.


Double Submit Cookies Pattern


You can find the link to Double Submit Cookies Pattern Web application GitHub repository here.

Step 1 and 2 is same as the Synchronzier pattern.  But in step 3, we generate a csrf token for the session and set a csrf cookie in the browser.

3. At the same time, generate the CSRF token for the session and set a csrf cookie in the browser.


Note that we don't store the csrf token in the server side. The reason we set httpOnly flag to false is to allow JavaScript to access the csrf cookie when the page loads. 


4. Implement a webpage that has a HTML form. The method should be POST and action should be another URL in the website.


5. When the html form is loaded, run a javascript which reads the csrf token cookie value in the browser and add a hidden field to the html form modifying the DOM.


Since we have set the httpOnly flag to false, we can access the csrf cookie in the browser. We obtain all the cookies using document.cookie and split the key value pairs using ' ; '. After splitting, we pass the key value pairs to a array. Using a for loop, we identify the csrf cookie by using the csrf cookie name we set in the server side. Then we extract the csrf token value and create a input element and append the input element to the html form element with the csrf token.

If we have set httpOnly flag to true,  we would get the below error response.


When the form is submitted to the action, the CSRF token cookie will be submitted and also in the form body, the CSRF token value will be submitted. 


6. In the web page that accepts the form submission ('/login'), obtain the CSRF token received in the cookie and also in the message body.


req.cookies._csrf is the csrf cookie with the csrf token value which was passed to the server side after submitting the form. req.body._csrf contains the csrf token value in the hidden field inpu
t explained in step 5. . if both values are matching we get a success message as below.


IMPORTANT: Note that all the console logs in the implementation are for testing purposes. 

Ashen Jayasinghe
Full Stack Developer
DMS

Sunday, September 3, 2017

Validation Of Duplicate and Empty Rows in JavaScript

Hi there!

In this blog post you will learn how to avoid (validate) duplication and empty rows in a table when you search and select data from a drop down list.

 So every time when I want to implement this validation at my work place I use a common function to identify the id of the selected data (object) from the drop down list and the id of already stored objects and if they are matching or equal, the function will return true hence not allowing duplicate rows. Below is the common function to avoid duplicate rows.

function containsObject(obj, list) {
    var i;
    for (i = 0; i < list.length; i++) {
        if (list[i].id === obj.id) {
            return true;
        }
    }
    return false;
}


Paste the above function somewhere in your controller and call it in the function used to add data to the table. For an example, suppose you want to add user details to a table and you have a function called "AddUserDetails".

$scope.AddUserDetails = function () {

         var tempList = { } ; 
     
         tempList.id = $scope.selectedUserDetails.id;

         templist.name= $scope.selectedUserDetails.name;

         if ( !containsObject (tempList , storedUserList )

         {
             $scope.storedUserList.push ( tempList ) ;
         }
}


The newly selected object is passed to an array called "tempList" and that object in tempList is checked with every object that is stored in the "storedUserList" array by the common function. If there are matching id's of objects in those two arrays, the function will not push the selected object to the storedUserList array.

----- Happy Coding! -----


Friday, June 30, 2017

Pharmacy Management System - SLIIT Project NodeJs , AngularJs , MongoDB

This is a pharmacy management system for a hospital developed for the 3rd year first semester final project by 4 members. The system will manage all the pharmaceutical operations to provide comprehensive pharmacy services. Basic features of this system would be managing the drug inventory, patient medical profiles, drug dispensing and prescription management. The main users of this system would be the chief pharmacist, assistant pharmacists, and doctors. They have to login to the system in order to use the services available.

The main benefits of this system are reducing manual data entry, reducing human errors, saves time, and increased efficiency. The system is able to generate customized reports on each of the services when required.

Technologies Used 

  • AngularJS for the front end
  • Github 
  • MongoDB ,Mongoose Library,  ExpressJS and NodeJS for the backend.
  • JetBrains WebStorm IDE


Backend is an API running JSON based web services. The front-end application communicates with the back end only using these web services. 

My part was to monitor the drug stock level and decide whether to re-order from drug suppliers via email after the approval of chief pharmacist if drug levels are low and record supplier details.

Click here to download the source code from GitHub.


Thursday, June 29, 2017

ng-model in AngularJS

Models in Angular.JS are represented by the "ng-model" directive. The primary purpose of this directive is to bind the "view" to the "model".

The ng-model attribute is used for,

  • Binding controls such as input, text area and select in the view into the model. 
  • Provide a validation behavior - for example a validation can be added to a textbox that only numeric characters can be entered into the textbox. 
  • The ng-model attribute maintains the state of the control (By state, we mean that the control and the data is bound to be always kept in sync. If the value of our data changes , it will automatically change the value in the control and vice versa)

Monday, May 1, 2017

Simple JavaScript Application with MEAN


In this tutorial we will allow users to enter a first name and a last name that will save to the MongoDB database.

I have used JetBrains WebStorm IDE for this tutorial.

Create a project in Webstorm to get started.
.
First step is to create a file that will contain the code for our Node.js server. So create a file and call it as app.js  and include the below code.


In order for express , body-parser and mongoose to work you should install them to the package,json file as dependencies.

First, go to the directory of the project and run these commands in the command prompt.

1. npm init  - The command prompt will ask you some questions and it will create the package.json                           file.

2.Then run these commands.

         npm install express --save

         npm install mongoose --save

         npm install body-parser --save

After installing them you can open the package.json file and see whether those frameworks have been installed properly.

Create a html file and call it as index.html and paste the below code.

<!DOCTYPE html>
<html>
  <head>
    <title>Intro to Node and MongoDB</title>
  </head>

  <body>
   
    <form method="post" action="/addname">
      <label>Enter Your Name</label><br>
      <input type="text" name="firstName" placeholder="Enter first               name..." required>
      <input type="text" name="lastName" placeholder="Enter last name..."       required>
      <input type="submit" value="Add Name">
    </form>
  </body>
</html>


After doing so save the code and go to the project directory open the command prompt and run node app.js to start our server.

Make sure your mongod is running. 

Open up a browser and navigate to the url

http://localhost:3000

Enter your first name and last name in the input fields and then click the “Add Name” button. You should get back text that says the name has been saved to the database.


Monday, March 13, 2017

How I built a simple calculator using AngularJS in less than 15mins

Hi there! Yeah you read that right!
I'm starting to love AngularJS framework. I should have used this framework for my previous academic projects since this feature called data binding eliminates much of the code.

Before we start there are three components of AngularJS that you should know to understand how this simple calculator works. 😏 
  1. ng-app - This directive defines and links an AngularJS application to HTML.
  2. ng-model - Binds the values of AngularJS application data to HTML input controls.
  3. ng-bind - Binds the AngularJS application to HTML tags
  4. ng-controller - It defines the application controller.Controller is a JavaScript Object created by                           a standard JavaScript Constructor.

Now that we know these main components lets get started!!!

If you have read my previous articles on JavaScript then you'll see that I have separated the HTML part and JavaScript part in separate files and I did the same here.


HTML part!


As you can see this HTML code is fairly simple! The ng-app and ng-controller is declared in a single div element rather than declaring them in an extra level.

And also we have 2 input boxes and select element which has ng-model to bind the values entered into the input boxes to the AngularJS application data. 

The last part we have a function call {{ result() }} in the directive which is interesting! 

JavaScript part!


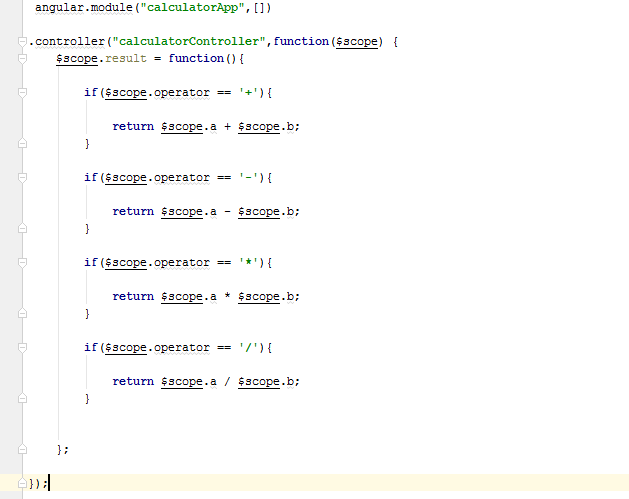
An AngularJS module (angular.module() ) defines an application and it is a container for the different parts of an application,
In the JavaScript part we create a angular module and controller and we declare the result as an attribute of the current scope. 
And when you make a controller in AngularJS, you pass the $scope object as an argument.

.controller( "      " , function($scope) {

 $scope.result = function() {}

}

And the last part of the JavaScript code calculating the math operations are simple which is familiar hence not worth going in detail.

Happy coding!!! ✌👍

--Ashen Jayasinghe--


Tuesday, February 21, 2017

Javascript Tutorial


First I will be explaining the answers for the questions in the 2nd lab sheet in detail and the screenshots of the working code will be shown at the end of each question.

1)

//write a function as a variable that prints "Hello World" to console and another function which //accepts that variable.


var printHello = function () {

console.log("Hello World");

}

printHello(); //calling function


// The argument passed to the second function should be executed as a function inside the body.

function getInstance (hello) {

hello();

}

//Call the second function passing the first function as the argument.

getInstance(printHello);


Okay now we are done with the first question!!! 😄😄 Moving on to the 2nd question.
   

2) 

Use curly brackets to create JSON like JavaScript object and add properties and functions to the object.


3 )

  • Declare a global variable named vehicleName in the window object
                            window.vehicleName = "Toyota";


  •   Declare a method named printVehicleName to print out the vehicle name
                                     function printvehicleName() {

                 console.log("Vehicle Name = " + this.vehicleName);
                           }                                 

  •  Declare an object named Vehicle(using object literal notation) which have a variable called vehicleName and declare a function named getVehicleName and assign it with the printVehicleName
                                       var Vehicle = {

                        vehicleName:"Nissan",
                        amount:100,
                        id:001,
                        getVehicleName:printvehicleName //.bind(window)                                    
                       };


  •  Execute the printVehicleName function and the getVehicleName functions to see the results
                                       printVehicleName();

                      Vehicle.getVehicleName();


  Correct the getVehicleName to print out the global variable vehicleName using the this keyword.

                        function printVehicleName() {

              console.log(this); // this prints the global vehicle name 'Toyota'

              console.log("Vehicle Name = " + this.vehicleName); // prints 'Nissan'
                       
                    }


4)
    Create a separate function using JavaScript closure which accepts the tax percentage and returns a function which accepts the amount and returns the amount after adding tax percentage. Try adding tax percentage to ‘this’ object and check if it works.


5)

Write a function to call GitHub API (https://api.github.com/users) and get users and return the users to the caller.