Showing posts with label Java. Show all posts

Saturday, April 13, 2019

Securing a Microservice With Keycloak

Hi there!
In this post, I'll be demonstrating the way I secured a microservice with Keycloak. The sample microservice is created using JAX-RS and deployed to wildfly11.


Prerequisites

  1. Keycloak docker image - https://hub.docker.com/r/jboss/keycloak/
  2. Java 7/8 and Maven 3
  3. Wildfly11

The secured microservice project is hosted on GitHub. Please click here to clone the project.

A look at the Microservice

The microservice contains only a single REST endpoint called PERSON API which will return a json message with the application name, name of the person extracted from query parameter and other sample parameters.

PersonAPI.class 


package com.demo.keycloak.service;

import com.google.gson.Gson;
import com.google.gson.GsonBuilder;
import org.slf4j.Logger;
import org.slf4j.LoggerFactory;

import javax.ws.rs.HeaderParam;
import javax.ws.rs.POST;
import javax.ws.rs.Path;
import javax.ws.rs.PathParam;
import javax.ws.rs.core.Context;
import javax.ws.rs.core.Response;
import javax.ws.rs.core.UriInfo;
import java.util.HashMap;
import java.util.Map;

@Path("/keycloak-demo")
public class PersonAPI {

    private static Gson gson = new GsonBuilder().create();

    @POST
    @Path("person/{name}")
    public Response start(@PathParam("name") String personName, String requestBody,
                          @HeaderParam("Authorization") String authorization, @Context UriInfo uriInfo) {

        Map<String, Object> reponseMap = new HashMap<>();

        final String path = uriInfo.getAbsolutePath().getPath();
        final String appName = path.substring(1, path.indexOf("-"));
        logger.info("\n\n Application Name : " + appName);

        reponseMap.put("CLIENT_ID", appName);
        reponseMap.put("SUCESS", true);
        reponseMap.put("PERSON_NAME", personName);

        return Response.status(200).entity(convertMapToJSONString(reponseMap)).header("Content-Type", "application/json")
                .build();
    }

    public String convertMapToJSONString(Map<String, Object> responseMap) {
        logger.debug("\n\n convertMapToJSONString :: responseMap :" + responseMap.toString());
        return gson.toJson(responseMap);
    }


    private static final Logger logger = LoggerFactory.getLogger(PersonAPI.class);

}

Securing the REST Endpoint 


Below are the keycloak maven dependencies needed. 


    <!-- keycloak jars -->

        <dependency>
            <groupId>org.keycloak</groupId>
            <artifactId>keycloak-core</artifactId>
            <version>${keycloak-version}</version>
            <scope>provided</scope>
        </dependency>
        <dependency>
            <groupId>org.keycloak</groupId>
            <artifactId>keycloak-common</artifactId>
            <version>${keycloak-version}</version>
            <scope>provided</scope>
        </dependency>
        <dependency>
            <groupId>org.keycloak</groupId>
            <artifactId>keycloak-authz-client</artifactId>
            <version>${keycloak-version}</version>
            <scope>provided</scope>
        </dependency>
        <dependency>
            <groupId>org.keycloak</groupId>
            <artifactId>keycloak-adapter-core</artifactId>
            <version>${keycloak-version}</version>
            <scope>provided</scope>
        </dependency>
        <dependency>
            <groupId>org.keycloak</groupId>
            <artifactId>keycloak-adapter-spi</artifactId>
            <version>${keycloak-version}</version>
            <scope>provided</scope>
        </dependency>

Now, we need to secure {{hostname}}/keycloak-demo-service/keycloakDemoService/keycloak-demo/person/ashen by adding constraints and roles to web.xml file.

web.xml


<?xml version="1.0" encoding="UTF-8"?>
<web-app xmlns:xsi="http://www.w3.org/2001/XMLSchema-instance"
         xmlns="http://java.sun.com/xml/ns/javaee" xsi:schemaLocation="http://java.sun.com/xml/ns/javaee http://java.sun.com/xml/ns/javaee/web-app_3_0.xsd" metadata-complete="false" version="3.0">
  <display-name>Restful Web Application</display-name>
  <context-param>
    <param-name>resteasy.scan</param-name>
    <param-value>true</param-value>
  </context-param>
  <context-param>
    <param-name>resteasy.servlet.mapping.prefix</param-name>
    <param-value>/keycloakDemoService</param-value>
  </context-param>

  <!-- keycloak -->

  <context-param>
    <param-name>keycloak.config.resolver</param-name>
    <param-value>com.demo.keycloak.auth.KeycloakAuthResolver</param-value>
  </context-param>

  <security-constraint>
    <web-resource-collection>
      <web-resource-name>REST endpoints</web-resource-name>
      <url-pattern>/keycloakDemoService/keycloak-demo/person/*</url-pattern>
    </web-resource-collection>
    <auth-constraint>
      <role-name>personAPI</role-name>
    </auth-constraint>
  </security-constraint>


  <login-config>
    <auth-method>KEYCLOAK</auth-method>
    <realm-name>JavaSecurity</realm-name>
  </login-config>

  <security-role>
    <role-name>personAPI</role-name>
  </security-role>

  <!--RestEasy-servlet-->

  <listener>
    <listener-class>
      org.jboss.resteasy.plugins.server.servlet.ResteasyBootstrap</listener-class>
  </listener>

  <servlet>
    <servlet-name>resteasy-servlet</servlet-name>
    <servlet-class>
      org.jboss.resteasy.plugins.server.servlet.HttpServletDispatcher</servlet-class>
  </servlet>

  <servlet-mapping>
    <servlet-name>resteasy-servlet</servlet-name>
    <url-pattern>/keycloakDemoService/*</url-pattern>
  </servlet-mapping>

</web-app>

Above snippet configures  the Undertow (Undertow is the Web Server on Wildfly ) to require the users to have certain roles to be allowed to invoke the person endpoint. In this case the person endpoint requires the role personAPI.

Creating a Realm in Keycloak


What is a realm in Keycloak?

A realm manages a set of users, credentials, roles, and groups. A user belongs to and logs into a realm. Realms are isolated from one another and can only manage and authenticate the users that they control.

Create a realm called 'JavaSecurity' 

Creating a Client in Keycloak


Now we need to create a client for the microservice within Keycloak. The client name will be 'keycloak-demo'. Open Keycloak Admin Console in your browser. http://localhost:8080/auth/
Sign in and click on Clients in the menu on the left hand side. Once that's open, click on Create on top of the table and you will navigated to a page as shown below.


Click on Save and you will redirected to a page as shown in below screenshot.  Change the access type to public.
Access Type : Public
Public access is for client side clients that need to perform a browser login.


Now click on the installation tab on top of the form. Select Keycloak OIDC JSON. This should provide a json object as below with required configuration for the keycloak client adapter.


{
  "realm": "JavaSecurity",
  "realm-public-key": "MIIBIjANBgkqhkiG9w0BAQEFAAOCAQ8AMIIBCgKCAQEA2Oj1K8EHWyAkaggvteHnETu3acwn5U8PaU0BixBM1nke5cgNXWE3I5M4zDfmNG2Egub2jmMHyRbF9U10ovQzhE1HhDFN+3ob/+Wz8Dy0ZF6GXAzyWYe64vx1MiDq5764HNQGAv+zSlUD0S7TIbCrw3h9XBJQNqeJsOurpIVu2+M0wxXXOylmIaCVFqf509rMPcdmS+UocZ7+2mAC7eJ5z4u6j5rsBvSK74tKQb7tcJHXcY3TO6owKayUVrdDHnruYhQxQu1x0FeemDrtvv6D7O2FhhOWIBJcvgLyuuyFYH687o/xxaD9Ye+P9SP1NYCbRmlkVQJ3DPs6ibLQkaDr4QIDAQAB",
  "auth-server-url": "http://localhost:8080/auth",
  "ssl-required": "external",
  "resource": "keycloak-demo",
  "public-client": true,
  "use-resource-role-mappings": true
}

This json object is copied to the keycloak.json file inside resources folder. The linking between the keycloak adapter and the keycloak.json happens from KeycloakAuthResolver class. This class overrides the Keycloak config resolver which enables to reside the keycloak.json file externally and provide the path in the standalone.xml file. If the external keycloak.json file is not available, by default it will look into the keycloak,json file inside resources folder.

Creating User and Roles


Create a role called "PersonAPI" under keycloak-demo client as shown below. 


Create a user as shown below.


Assign the "PersonAPI" role to the created user.


Get the access token


Paste the access token to the Authorization header of the Person request as shown below. If the access token is invalid, unauthorized error message will be received.


if valid, below response will be received.


!...Happy Coding...!

Ashen Jayasinghe
DMS
Full Stack Developer

Sunday, March 24, 2019

Refactoring a complex Java EE Monolithic App to Microservices

Hi there! In this blog post, I have addressed some of the major questions that will arise when transforming a Java EE monolithic application to a microservice architecture from my own experience.

I have been working at the final phase of a Java EE monolithic telecommunication application. According to the client requirements, after the final phase, we should break down the functionalities of the monolith application which is packaged on a single WAR archive to multiple micro services. ( multiple JARs and WARs ). Initially, I was assigned for a research task on microservices to identify the best practices, technologies and methods for breaking down the monolith application.

Below are the identified steps from the research in order to migrate the monolith application to microservices.

1. Follow Domain driven design architecture when creating micro-services or decomposing the existing monolith application. (Sub domains, boundary contexts, context maps)
2. Repackage the application
  • Repackage the app into multiple individual WAR files and apply container-per-service pattern and deploy each WAR file separately in to Wildfly or Docker container.
  • Build, deploy, and manage independently: After the WAR files are split, you can manage each WAR file independently through an automated DevOps pipeline.

3. Refactoring the application code.

Existing REST or JMS services ; You might have services that are already compatible with a microservices architecture, or that can be made compatible. Start by untangling each REST or simple JMS service from the rest of the WAR file, and then deploy each service as its own WAR file. At this level, duplication of supporting JAR files is fine—this is still mostly a question of packaging.

Existing EJB services : If you have services, they were probably built by following a functional approach, such as the Service Façade pattern. In this case, you can usually refactor function-based services design into an asset-based services design. If the functions in the Service Façade were written as create, retrieve, update, and delete operations on a single object, the mapping to a RESTful interface is simple: reimplement the EJB session bean interface or JAX-WS interface as a JAX-RS interface.

Internal Structure of a microservice
Calls to external services should be separate from the domain logic. Below figure shows a simplified version of a microservice architecture. This architecture separates the domain logic from any code that interacts with or understands external services. The architecture is similar to the Ports and Adapters (Hexagonal) architecture

Resources expose JAX-RS resources to external clients. This layer handles basic validation of requests and then passes the information into the domain logic layer.

Domain logic, as a general concept, takes many forms. In Boundary-Entity-Control patterns, domain logic represents the entity itself, with parameter validation, state change logic, and so on.

Repositories are optional, but can provide a useful abstraction between the core application domain logic and the data store when present. This configuration allows the backing data store to be changed or replaced without extensive changes to the domain logic.

Service connectors are similar to the Repository abstraction, encapsulating communications with other services. This layer functions as either a façade or an “anti-corruption” layer to protect domain logic from changes to external resource APIs, or to convert between API wire formats and internal domain model constructs.

http://alistair.cockburn.us/Hexagonal+architecture
http://martinfowler.com/articles/microservice-testing/#anatomy-modul


4. Refactoring the data.
  • Isolated islands of data
Begin by looking at the database tables that your code uses. If the tables are either independent of all other tables or come in a small, isolated island of a few tables that are joined by relationships, you can split the tables from the rest of your data design. Then you can consider the right option for your service. For instance, do you stay in SQL, but consider moving from a heavyweight enterprise database such as Oracle to a smaller, self-contained database like MySQL? Or do you consider a NoSQL database to replace your SQL database?

The answer to that question depends on the kinds of queries you run on your data. If most of the queries are simple queries on "primary" keys, a key-value database or a document database might serve you well. Alternatively, if you have complex joins that vary widely—for example, your queries are unpredictable—staying with SQL might be your best option.

  • Batch data updates 
If you have only a few relationships and you decide to move your data into a NoSQL database anyway, consider a batch update into your existing database. When you consider the relationships between tables, the relationships often don't take a time factor into consideration. They might not need to be always up to date—a data dump/load approach that runs every few hours might be fine for many cases.

  • Table denormalization
If you have more than a few relationships to other tables, you might be able to refactor, or in database administrator (DBA) terms, "denormalize," your tables. Even the discussion of this idea might alarm a DBA. However, your team as a whole should think about why data was normalized to begin with. Often, the reason for highly normalized schemas was to reduce duplication, which was to save space, because disk space was expensive. However, that's not true anymore. Instead, query time is now the factor you want to optimize. Denormalization is a straightforward way to achieve that.

https://www.ibm.com/cloud/garage/architectures/microservices/refactor-to-microservices


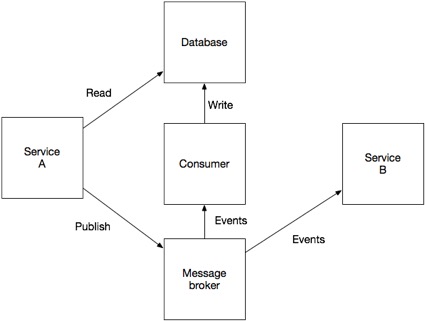
5.  Inter-service-communication - Use Saga Pattern (Event driven architecture)

Use Saga Pattern to maintain data consistency / usability across services if each service has its own database. 

This pattern has the following benefits
  • It enables an application to maintain data consistency across multiple services without using distributed transactions .
This solution has the following drawbacks:
  • The programming model is more complex. For example, a developer must design compensating transactions that explicitly undo changes made earlier in a saga. 
There are also the following issues to address:
  • In order to be reliable, a service must atomically update its database and publish an event. It cannot use the traditional mechanism of a distributed transaction that spans the database and the message broker. Instead, it must use one of the patterns listed below.

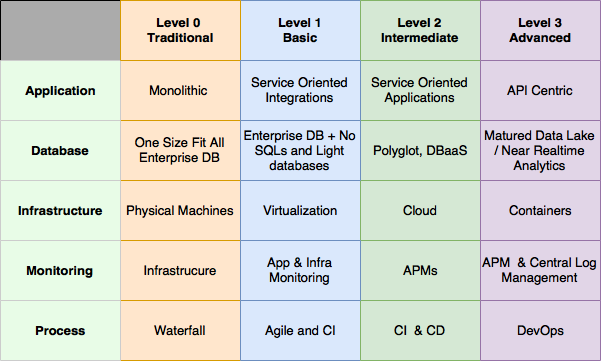
Microservices maturity model


References


https://microservices.io/patterns/microservice-chassis.html
https://www.nginx.com/blog/refactoring-a-monolith-into-microservices/
https://stackoverflow.com/questions/30286443/microservices-how-to-store-source-code-of-many-microservices
https://microservices.io/patterns/observability/health-check-api.html
http://projects.spring.io/spring-cloud/
https://microservices.io/patterns/observability/distributed-tracing.html
https://martinfowler.com/bliki/CircuitBreaker.html
https://dzone.com/refcardz/getting-started-with-microservices?chapter=5
http://callistaenterprise.se/blogg/teknik/2015/03/25/an-operations-model-for-microservices/
http://callistaenterprise.se/blogg/teknik/2017/05/12/building-microservices-part-6-configuration-server/
http://callistaenterprise.se/blogg/teknik/2017/09/13/building-microservices-part-8-logging-with-ELK/
http://callistaenterprise.se/blogg/teknik/2015/04/10/building-microservices-with-spring-cloud-and-netflix-oss-part-1/
https://www.infoq.com/articles/microservices-aggregates-events-cqrs-part-1-richardson


Monday, November 26, 2018

Using Camunda HTTP-Connector

Hi there!

We can use the HTTP Connector in Camunda to call the relevant REST Endpoint from service tasks in the bpmn diagram. According to the below diagram, "Dummy Service 1 and 2"  are service tasks which will invoke the Rest endpoints.


A generic API exists to set parameters of a request. The following parameters are available.


In order to pass the Authorization key as a http header to the REST Endpoint, we have to check whether the auth key has more than 4000 characters. If so, the camunda engine will throw a jdbc exception. https://stackoverflow.com/questions/53471783/how-to-alter-camunda-database-to-accept-long-string-variables

To avoid the exception, you have to use java serialization for persisting the long string value.

RuntimeService runtimeService = processEngine.getRuntimeService();

VariableMap variables = Variables.createVariables();
variables.putValueTyped("var", Variables
          .objectValue(aLongStringValue)
              // tells the engine to use java serialization for persisting the value 
          .serializationDataFormat(SerializationDataFormats.JAVA)  
          .create());

// Start a process instance
ProcessInstance processInstance = runtimeService.startProcessInstanceByKey("testProcess", variables);

Limitations of this approach are:
  1. You cannot use this variable in queries, for example runtimeService.createVariableInstanceQuery().variableValueEquals("var", aLongStringValue).list() would not find the variable
  2. Whenever you fetch the variable, you will have to use the API that returns deserialized values (e.g. RuntimeService.getVariable("name") or RuntimeService.getVariableTyped("name", true)) to get the actual value. This can be a problem if you rely on the feature that the engine can serve variables in their serialized format (which is for a regular String variable just the plain String value; for a Java-serialized Object value, it is a base64-encoded String of the byte representation).
Ashen Jayasinghe
Software Developer 
DMS

Tuesday, October 9, 2018

OAuth 2.0 Simplified with Node.js

Hi there!
OAuth 2.0 is an authentication protocol that is used to authenticate and authorize users in an application by using another service provider. 

In this post, we will authenticate using GitHubs Auth2 API and build a sample node application running on the local port 8080 with a web interface.

You can get the source code from here.

 OAuth2 flow

There are 3 parties in any OAuth flow:
1. Client  - The person or user who is logging in
2. Consumer - The application that the client wants to log in to
3. Service Provider - The external application through which the user authenticates

So in our use-case, the client would be the web interface, the consumer would be the application running on localhost:8080 and the service provider would be GitHub. 

Below diagram explains the flow of the application.

Once we start the application, we will be directed to a page as below.


<body>
        <a href="https://github.com/login/oauth/authorize?client_id=*****&redirect_uri=http://localhost:8080/oauth/redirect">
                Login with github</a>
</body>

The above link has three key parts

1. https://github.com/login/oauth/authorize is the OAuth Gateway for GitHub's OAuth flow. All OAuth providers have a gateway URL that you have to send the user in order to proceed.

2.  client_id=***** this specifies the client id of the application. This ID will tell GitHub about the identity of the consumer who is trying to use their OAuth service. OAuth service providers have a portal where you can register your consumer. I registered my sample node application using the GitHub registration portal found here https://github.com/settings/applications/new.


On registration, you will receive a client id and a client secret which is used in the above URL.

3. redirect_uri=http://localhost:8080/oauth/redirect specifies the URL to redirect to with the request token once the user has been authenticated by the service provider. This URL has also been set when registering the application at GitHub Registration portal (see above screenshot).

Once you click the "Login with GitHub" link, you will be redirected to the familiar OAuth Page to register with GitHub.


Once the user authenticates with GitHub, they get redirected to the redirect URL that was specified earlier, along with the request token appended to the redirect url, by the service provider (GitHub). GitHub adds this as a code parameter so the redirect url will be something like http:localhost:8080/oauth/redirect?code=<request token>.

We need the request token and client secret to get the access token , which is the token that is actually used to get the information about the user. We get this access token by making a POST HTTP call to https://github.com/login/oauth/access_token?client_id=${CLIENTID}&client_secret=${CLIENTSECRET}&code=${REQTOKEN}


Once the redirect URL execute a POST request to get the access token as explained above, if the access token is received, the user will be redirected to the welcome page. The welcome page is the page we show after the user has logged in. Now that we have the users access token, we can obtain their account information on their behalf as authorized GitHub users.

There are many API's available in GitHub's API Documentation, however we will be using the /user API to get basic information about the user. In the welcome page, first we extract the access token from the browser's query param since we redirected to welcome page with the access token (http://localhost:8080/welcome.html?access_token=<accessToken>), then we call https://api.github.com/user and include the access token as a header. 


The response from the above GET request will have many fields which is shown below through Postman.


Finally, the welcome page will display a greeting which includes the login username extracted from the above JSON payload as ${ res.login }


Ashen Jayasinghe
Full Stack Developer
DMS

Thursday, September 20, 2018

JAVA-JSON Serialization & Deserialization Using JACKSON

Converting JSON String to MAP


try {
   ObjectMapper mapper = new ObjectMapper();
   String json = "{\"JSON\":{\"type\":\"ID\",\"value\":\"vvv\"},\"info\": \"Yes\"}";
   Map<String, Object> map = new HashMap<String, Object>();
   // convert JSON string to Map
   map = mapper.readValue(json, new TypeReference<Map<String, Object>>(){});
   System.out.println("CONVERTING JSON STRING TO MAP--="+map);

  } catch (JsonGenerationException e) {
   e.printStackTrace();
  } catch (JsonMappingException e) {
   e.printStackTrace();
  } catch (IOException e) {
   e.printStackTrace();
  }


Converting MAP to JSON String


ObjectMapper mapper2 = new ObjectMapper();
  Map<String, Object> carMap = new HashMap<String, Object>();
  carMap.put("car", "Audi");
  carMap.put("price", "30000");
  carMap.put("model", "2010");
  List<String> colors = new ArrayList<String>();
  colors.add("Grey");
  colors.add("White");
  colors.add("Black");
  carMap.put("colors", colors);
  try {
   String jsonString = new ObjectMapper().writeValueAsString(carMap);
   System.out.println("Convert Map to JSON String=="+jsonString);
  } catch (JsonProcessingException e) {
   e.printStackTrace();
  }


Converting MAP to JSON Object


try {
   JSONObject jsonObject = new JSONObject(carMap);
   System.out.println("Convert Map to JSON Object=="+jsonObject);
  } catch (Exception e) {
   e.printStackTrace();
  }


Converting JSON Object to MAP

try {
   String jsonjsonString = "{\"JSON\":{\"type\":\"ID\",\"value\":\"vvv\"},\"info\": \"Yes\"}";
   ObjectMapper mapper12 = new ObjectMapper();
   JsonNode jsonNode = mapper12.readTree(jsonjsonString);
   Map<String, Object> mapp = new HashMap<String, Object>();
   mapp = convertJSONObjectToMap(jsonNode);
   System.out.println("Convert JSON Object to Map =="+mapp);
  } catch (Exception e) {
   e.printStackTrace();
  }


Output :


Tuesday, January 30, 2018

GETTING STARTED WITH JAVA, TRAVIS CI AND HEROKU.


Hi there!

This post will drive you into a basic application in Spring Boot, building through Travis CI and finally deploying to Heroku.
First of all , Lets clone the sample Hello World Spring Boot project through eclipse, which I have already integrated from Travis CI and deployed to Heroku, from here. The project structure will look like below.


After cloning the project through eclipse, you can simply commit the project to your Github Repository.

TRAVIS-CI

Travis CI is a continuous integration service used to build and test software projects. It will be listening to our commits on Github and make all the deploy process for us. You can sign in with your Github account.


Once logged in , click in the + button (besides "My repositories" text) sync your account and enable the repository of our project.

Now we have to instruct Travis how to build the project. These instructions are already in the .travis.yml file which is in the Project directory.

Since this is a Java project we have to set the language as Java and the relevant jdk.

.travis.yml


language: java
jdk:
 - oraclejdk8
deploy:
 provider: heroku
 api-key: 
  secure: $HEROKU_API_KEY
 app: traviscitestashen

You can also set the build phase as <script: ./mvnw clean install> inside yaml file. This will bypass the default phase.
./mvnw install -DskipTests=true -Dmaven.javadoc.skip=true -B -V

HEROKU

Heroku is a Paas cloud computing service that supports several programming languages.
To get started, first we have to create an account, then create an app.
We have to give instructions how to correctly deploy our app.  For that we have to create a Procfile which is already created in the project root directory.

Procfile 

web: java $JAVA_OPTS -Dserver.port=$PORT -jar target/*.jar -Dspring.profiles.active=prod

Make sure packaging in pom.xml is set to jar file.

Next we have to teach Travis CI to deploy the project on Heroku after integration services are passed.
First we have to copy HEROKU API KEY from account settings.

After that, go to your repository settings in Travis CI and add a new variable called "HEROKU_API_KEY" and for the value, paste the copied Heroku Api Key.


Next you have to enable automatic deploy and tick 'wait for CI to pass" checkbox in your Heroku app deploy section.


Thats it! The configurations that is required to deploy the app are already in the .travis.yml file as

deploy:
 provider: heroku
 api-key: 
  secure: $HEROKU_API_KEY
 app: traviscitestashen

Note that the app name in yaml file should be the same as the app name in Heroku.

Now it's time to test the continuous integration and continuous deployment. Add a change to the project and commit it to your Github repo. Travis Ci will start the integration and if all goes well (excited with 0 in console) you should get a output as below and if not, app will not be deployed to Heroku.


After all the integration services are passed , Travis Ci will deploy the app to Heroku.


Alright That's it folks, now you can open the app from Heroku dashboard and you should be able to  see a output as shown below.


Links
https://docs.travis-ci.com/user/languages/java
https://blog.frankel.ch/travis-ci-tutorial-for-java-projects/
https://blog.javabien.net/2015/08/21/travis-ci-on-a-java-project-with-docker-support/

Happy Coding! :)

~ Ashen Jayasinghe ~

Monday, January 29, 2018

REST WS using Apache Camel CXFRS Component


Hi there!
In this post, I will try to explain how to write a web service using Apache Camel CXFRS component.
It will be a simple web service that will accept a GET and a POST request and returns a plain text output for the GET request and a JSON object for the POST request.

1. Start by creating a simple Maven Project , Choose the archetype of webapp. The final project structure will appear as follows.


2. Include the below dependencies in the pom.xml file.


<project xmlns="http://maven.apache.org/POM/4.0.0" xmlns:xsi="http://www.w3.org/2001/XMLSchema-instance" xsi:schemaLocation="http://maven.apache.org/POM/4.0.0 http://maven.apache.org/xsd/maven-4.0.0.xsd">
  <modelVersion>4.0.0</modelVersion>
  <groupId>ExampleRestAPI</groupId>
  <artifactId>com.restapi</artifactId>
  <version>0.0.1-SNAPSHOT</version>
  <packaging>war</packaging>
  <name>Rest Api Camel </name>
  <description>Rest API Camel project</description>
 
<properties>
<camel-web>2.5.0</camel-web>
<camel-version>2.12.0</camel-version>
<xbean-spring-version>3.5</xbean-spring-version>
</properties>
 
<dependencies>
 
<!-- Spring + Camel jars -->
 
<dependency>
<groupId>org.apache.xbean</groupId>
<artifactId>xbean-spring</artifactId>
<version>${xbean-spring-version}</version>
</dependency>
 
<dependency>
<groupId>org.apache.camel</groupId>
<artifactId>camel-spring</artifactId>
<version>${camel-version}</version>
</dependency>
<dependency>
<groupId>org.apache.camel</groupId>
<artifactId>camel-jms</artifactId>
<version>${camel-version}</version>
</dependency>
 
<dependency>
<groupId>org.apache.camel</groupId>
<artifactId>camel-stream</artifactId>
<version>${camel-version}</version>
</dependency>
 
<dependency>
<groupId>org.springframework</groupId>
<artifactId>spring-web</artifactId>
<version>3.2.4.RELEASE</version>
</dependency>
 
<dependency>
<groupId>org.apache.camel</groupId>
<artifactId>camel-cxf</artifactId>
<version>${camel-version}</version>
</dependency>
 
<dependency>
<groupId>org.apache.camel</groupId>
<artifactId>camel-cxf-transport</artifactId>
<version>${camel-version}</version>
</dependency>
 
<dependency>
<groupId>org.apache.cxf</groupId>
<artifactId>cxf-rt-transports-http-jetty</artifactId>
<version>2.7.6</version>
</dependency>
 
<!-- Other jars (logging, io etc) -->
 
<dependency>
<groupId>org.apache.commons</groupId>
<artifactId>commons-io</artifactId>
<version>1.3.2</version>
</dependency>
 
<dependency>
<groupId>org.slf4j</groupId>
<artifactId>slf4j-log4j12</artifactId>
<version>1.7.5</version>
</dependency>
 
</dependencies>
</project>

We have used Apache Camel cxf jars , SLF4J jars , Apache common IO , Spring jars. Spring jars are used to load the Application Contexts automatically.

2. After adding the dependencies, start creating the required resources. First we will start creating the servlet which listens to the input html requests. The contents of the  WEB-INF/web.xml file will look as below.

<?xml version="1.0" encoding="UTF-8"?>
<web-app xmlns:xsi="http://www.w3.org/2001/XMLSchema-instance"
 xmlns:web="http://xmlns.jcp.org/xml/ns/javaee"
 xsi:schemaLocation="http://xmlns.jcp.org/xml/ns/javaee http://java.sun.com/xml/ns/javaee/web-app_2_5.xsd">
 <context-param>
 <param-name>test</param-name>
 <param-value>true</param-value>
 </context-param>
 <context-param>
 <param-name>contextConfigLocation</param-name>
 <param-value>/WEB-INF/applicationContext.xml</param-value>
 </context-param>
 <listener>
 <listener-class>org.springframework.web.context.ContextLoaderListener</listener-class>
 </listener>
</web-app>

Here we have added the applicationContext.xml as the contextConfigLocation and the listener class.
In the applicationContext.xml file, we have to set the route for all implementation classes.

3. Add the below configurations to the WEB-INF/applicationContext.xml file.


<?xml version="1.0" encoding="UTF-8"?>
<!-- Licensed to the Apache Software Foundation (ASF) under one or more contributor
 license agreements. See the NOTICE file distributed with this work for additional
 information regarding copyright ownership. The ASF licenses this file to
 You under the Apache License, Version 2.0 (the "License"); you may not use
 this file except in compliance with the License. You may obtain a copy of
 the License at http://www.apache.org/licenses/LICENSE-2.0 Unless required
 by applicable law or agreed to in writing, software distributed under the
 License is distributed on an "AS IS" BASIS, WITHOUT WARRANTIES OR CONDITIONS
 OF ANY KIND, either express or implied. See the License for the specific
 language governing permissions and limitations under the License. -->
 
<beans xmlns="http://www.springframework.org/schema/beans"
 xmlns:xsi="http://www.w3.org/2001/XMLSchema-instance" xmlns:context="http://www.springframework.org/schema/context"
 xmlns:camel="http://camel.apache.org/schema/spring" xmlns:p="http://www.springframework.org/schema/p"
 xsi:schemaLocation="
 http://www.springframework.org/schema/beans http://www.springframework.org/schema/beans/spring-beans.xsd
 http://www.springframework.org/schema/context http://www.springframework.org/schema/context/spring-context.xsd
 http://camel.apache.org/schema/spring http://camel.apache.org/schema/spring/camel-spring.xsd
 ">
 
<bean id="contextApplicationContextProvider" class="conf.ApplicationCtxProvider"></bean>
 
 <camelContext xmlns="http://camel.apache.org/schema/spring"
 id="Demo-Camel">
 
 <!-- All the Routes should be created within below Package -->
 <camel:package>camel.route</camel:package>
 
 </camelContext>
 
</beans>

In here we have added the route for all implementation classes under camelContext/camel:package as  camel.route which has the DemoRouteBuilder class that contains the REST endpoint URI.

4. Add the applicationContexts classes. These classes are loaded during spring initializing.

ApplicationCtx.java


package conf;
 
import org.springframework.context.ApplicationContext;
 
public class ApplicationCtx {
 
private static ApplicationContext ctx;
 
// Injected from the class "ApplicationCtxProvider" which is automatically loaded during Spring-Initialization.
 
public static void setApplicationContext(
ApplicationContext applicationContext) {
ctx = applicationContext;
}
 
// Get access to the Spring ApplicationContext from everywhere in your Application.
 
public static ApplicationContext getApplicationContext() {
return ctx;
}
}

ApplicationCtxProvider.java


package conf;
 
import org.springframework.beans.BeansException;
import org.springframework.context.ApplicationContext;
import org.springframework.context.ApplicationContextAware;
 
public class ApplicationCtxProvider implements ApplicationContextAware {
 

public void setApplicationContext(ApplicationContext ctx)
throws BeansException {
ApplicationCtx.setApplicationContext(ctx);
}
}

5. Add the camel router implementation to DemoRouteBuilder.java file. This class handles all the REST calls to the REST service. It will run automatically when the server starts since the location is mentioned in the applicationContect.xml file as camel.route. It consist of cxfrs endpoint URI and resourceClasses which points to the request service classes in camel.rs.

DemoRouteBuilder.java 


package camel.route;
 
import org.apache.camel.builder.RouteBuilder;
 
import camel.process.MappingProcessor;
import rs.RequestServiceImpl;
 
public class DemoRouteBuilder extends RouteBuilder {
 
private static final String REST_ENDPOINT_URI = "cxfrs://http://localhost:9003/rest?resourceClasses=rs.RequestServiceImpl";
 
@Override
public void configure() {
errorHandler(noErrorHandler());
 
from(REST_ENDPOINT_URI)
.routeId("RestFulService")
.process(new MappingProcessor(new RequestServiceImpl()));
}
 
}

6. Content of camel process is implemented by MappingProcessor.java file.


package camel.process;
 
import java.lang.reflect.InvocationTargetException;
import java.lang.reflect.Method;
 
import org.apache.camel.Exchange;
import org.apache.camel.Processor;
import org.apache.camel.component.cxf.common.message.CxfConstants;
public class MappingProcessor implements Processor {
 
private Class<?> beanClass;
private Object instance;
 
public MappingProcessor(Object obj) {
beanClass = obj.getClass();
instance = obj;
}
 
public void process(Exchange exchange) throws Exception {
String operationName = exchange.getIn().getHeader(CxfConstants.OPERATION_NAME, String.class);
Method method = findMethod(operationName,exchange.getIn().getBody(Object[].class));
try {
Object response = method.invoke(instance, exchange.getIn().getBody(Object[].class));
exchange.getOut().setBody(response);
} catch (InvocationTargetException e) {
throw (Exception) e.getCause();
}
}
 
private Method findMethod(String operationName, Object[] parameters)throws SecurityException, NoSuchMethodException {
return beanClass.getMethod(operationName,getParameterTypes(parameters));
}
 
private Class<?>[] getParameterTypes(Object[] parameters) {
if (parameters == null) {
return new Class[0];
}
Class<?>[] answer = new Class[parameters.length];
int i = 0;
for (Object object : parameters) {
answer[i] = object.getClass();
i++;
}
return answer;
}
 
}

7. Now we will start by coding the java resource which will handle the rest request. It will consist of a interface and a implementation class. The interface class will contain the web service annotations where as the implementation class will respond to the client requests. Here the paths are defined by using the path annotation. The main path is /book.  Each method defined in this class must be called staring from http://localhost:9003/rest/book. The interface class will look as below.

RequestService.java


package rs;
 
import javax.jws.WebParam;
import javax.ws.rs.Consumes;
import javax.ws.rs.GET;
import javax.ws.rs.POST;
import javax.ws.rs.Path;
import javax.ws.rs.PathParam;
import javax.ws.rs.Produces;
import javax.ws.rs.core.MediaType;
import javax.ws.rs.core.Response;
 
@Path("/book")
@Consumes("application/json")
@Produces(MediaType.APPLICATION_JSON)
public interface RequestService {
 
 @GET
 @Path("/author/{id}")
 @Produces(MediaType.APPLICATION_JSON)
 Response getAvailabilityResults(@PathParam("id") Long id); 
 
 @POST
 @Path("/search")
 @Produces(MediaType.APPLICATION_JSON)
 String getSearhResults(@WebParam(name="request") String request); 
 
}

RequestServiceImpl.java


package rs;
 
import javax.ws.rs.core.Response;
import javax.ws.rs.core.Response.Status;
 
import org.slf4j.Logger;
import org.slf4j.LoggerFactory;
 
public class RequestServiceImpl implements RequestService {
 
 final Logger logger = LoggerFactory.getLogger(RequestServiceImpl.class);
 
 public String getSearhResults(String request) {
 
 logger.info("getSearhResults().request : " + request);
 
 return "Hello request " + request;
 }
 
 public Response getAvailabilityResults(Long id){
 
 logger.info("getAvailabilityResults().Long : " + id);
 return Response.ok("Hello request ID :"+id).status(Status.OK).build();
 }
 
}

And that is all you require to write a REST web service with cxfrs component.

Build the project from Maven. I have used clean install package as the Maven goal in Eclipse.
Deploy the war file in a web container like Tomcat. I have used Tomcat 8 for this project.

Finally test the GET and POST methods using a rest client. I have used Postman.

GET 


POST


Also note that getSearhResults() method in RequestService class which accept POST requests only consumes json objects. If we remove the Consume annotation and send a XML input in the body, the
getSearhResults(0 will get invoked and you will be able to see the xml input. You can send any content type with the resource url and the method will get invoked as long as it doesn't contain consume annotation which consumes a specific content type. The example is below for your reference.


Happy Coding !!!

~ Ashen Jayasinghe ~