This post will drive you into a basic application in Spring Boot, building through Travis CI and finally deploying to Heroku.
First of all , Lets clone the sample Hello World Spring Boot project through eclipse, which I have already integrated from Travis CI and deployed to Heroku, from here. The project structure will look like below.
After cloning the project through eclipse, you can simply commit the project to your Github Repository.
TRAVIS-CI
Travis CI is a continuous integration service used to build and test software projects. It will be listening to our commits on Github and make all the deploy process for us. You can sign in with your Github account.

Once logged in , click in the + button (besides "My repositories" text) sync your account and enable the repository of our project.
Now we have to instruct Travis how to build the project. These instructions are already in the .travis.yml file which is in the Project directory.
Since this is a Java project we have to set the language as Java and the relevant jdk.
.travis.yml
language: java
jdk:
 - oraclejdk8
deploy:
 provider: heroku
 api-key:
  secure: $HEROKU_API_KEY
 app: traviscitestashen
You can also set the build phase as <script: ./mvnw clean install> inside yaml file. This will bypass the default phase.
./mvnw install -DskipTests=true -Dmaven.javadoc.skip=true -B -V
HEROKU
Heroku is a Paas cloud computing service that supports several programming languages.
To get started, first we have to create an account, then create an app.
We have to give instructions how to correctly deploy our app. For that we have to create a Procfile which is already created in the project root directory.
Procfile
web: java $JAVA_OPTS -Dserver.port=$PORT -jar target/*.jar -Dspring.profiles.active=prod
Make sure packaging in pom.xml is set to jar file.
Next we have to teach Travis CI to deploy the project on Heroku after integration services are passed.
First we have to copy HEROKU API KEY from account settings.
After that, go to your repository settings in Travis CI and add a new variable called "HEROKU_API_KEY" and for the value, paste the copied Heroku Api Key.

Next you have to enable automatic deploy and tick 'wait for CI to pass" checkbox in your Heroku app deploy section.

Thats it! The configurations that is required to deploy the app are already in the .travis.yml file as
deploy:
 provider: heroku
 api-key:
  secure: $HEROKU_API_KEY
 app: traviscitestashen
Note that the app name in yaml file should be the same as the app name in Heroku.
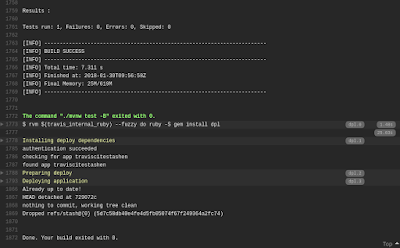
Now it's time to test the continuous integration and continuous deployment. Add a change to the project and commit it to your Github repo. Travis Ci will start the integration and if all goes well (excited with 0 in console) you should get a output as below and if not, app will not be deployed to Heroku.

After all the integration services are passed , Travis Ci will deploy the app to Heroku.

Alright That's it folks, now you can open the app from Heroku dashboard and you should be able to see a output as shown below.

Links
https://docs.travis-ci.com/user/languages/java
https://blog.frankel.ch/travis-ci-tutorial-for-java-projects/
https://blog.javabien.net/2015/08/21/travis-ci-on-a-java-project-with-docker-support/
Happy Coding! :)
~ Ashen Jayasinghe ~


No comments:
Post a Comment